
DRAPING
The process of positioning and pinning the fabric on a dress form is called draping. Draping can be used to create the basic pattern or to design organically by playing with the fabric on the form.
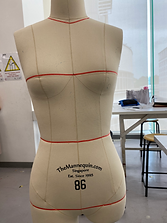
Preparation of dress form with style tapes
Draping week 1

Start by placing the style tape on the neckline

The front neckline should be dropped by 1cm to have more ease at the neckline.

Then, find the highest point at the bust to trace the bustline.

Back of the bustline should be traced accordingly.
Then trace down the waistline, which is the smallest part of the body. The hipline should be 20cm down the waistline & mid-hip line should be 10cm down the waistline.

Over here, I traced the mid-hip lines as well as the princess line on the right. Ensure that the princess line is also traced at the back.

After the princess line, place the tape on the centre front and centre back.

This is the back view of the centre back & princess line at the back. We only did the wearer's right as we were mostly going to drape on the wearer's right.

Place the tape for the sideline (side-seam) and the shoulder line (shoulder-seam). For the armhole, we need to have more ease, the tape should be placed 1cm above the shoulder circle and the bottom near the armpit.

At the front of the armhole, there is more space to create ease for the front sleeves. This is how the style tapes look at the back.

This is the finished dress form with style tapes. The style tapes should be symmetrical to both sides and pins should be secured.
Basic Bodice Dart (Waist Dart)


Prepare a piece of calico and make sure the length of the lengthwise grain and crosswise grain is correct. Draw a line parallel to the centre front and match it with the dress form. Mark the neckline, bust-line and waistline.
Pin the CF line at the neckline, bust-line, waist-line to the body form and the style tapes should match.
Pin the neckline and the shoulder-line. Smooth down the calico and move the fabric towards the shoulder to form the neckline. There will be tension at the neck area to remove the tension, have to snip at the neck area.
Smooth the fabric towards the armhole and pin the shoulder and underarm area. Pin the bust point. Smooth down the fabric and an ease will be seen near the bust.
Pin the waistline as well as the side seam. There will be also be need to create an ease near the waist dart. Smooth the fabric to make the waist dart on the princess line. There will be tension around the hip so to ease the tension snip a bit.
Before taking it off from the dress form, outline all the important lines and the dart and make some final adjustments to it.
Draw the seam allowances and true the dart. Finally put it on the mannequin again to see if it fits properly.
Basic Bodice Dart (armhole and waist dart)
Prepare the calico with the basic marking which is the centre front marking and the neckline marking. then, pin the calico on the dress form at the centre front line at the neck, bust line and waistline.

Smooth the fabric at the bust line part to the side seam. Make sure the waistline matches the waistline at the dress form.
Pin at the underarm as well. Smooth down the waistline and pin at the side seam and meeting point of the waistline.

Form the waist dart at the princess-line and make a dart at the armhole. To ensure that everything is smooth down ensure that that is a ease on the waistline and at the arm-hole.
When reaching the neck part, smooth the part near the neck and pin down the shoulder seam to form the neckline

There will be a lot of tension at the neckline area, to help this we need to snip the extra fabric and release the tension. After releasing the tension, smooth down the neckline to the shoulder part and meeting point at the armhole.

There should also be an ease at the armhole area. The dart at the bust should be towards the bust point bust stop before it touches the bust point.


Finally, outline the neckline, shoulder line, armhole, side seam and the darts. To also mark the bust points.

After that take out the calico from the dress form and true the line with ruler. Trim the allowance and leave a 1cm seam allowance and 2cm allowance for the side seam. When cutting the allowance of the fabric, make sure the darts are still pinned. After that put the calico on the dress form again, do some final adjustments and match it with the back bodice

Basic Bodice Dart (Neck dart)
Prepare the calico with basic marking, draw a line on the centre front marking the neckline and bust-line.

Pin the calico on the dress form at CF line at the neck, bust line and waistline

Smooth the fabric near the bust line to the side seam. At the same time, make sure the waistline is parallel to the waist at the dress form.

Pin at the underarm and the side seam by smoothing down to the waistline and pin at the meeting point of the waist and side seam

From the shoulder smooth the fabric towards the neckline and pin at the meeting point of the shoulder and neck. A dart should form at the neckline
There will be tension at the neck area to release the tension, we need to snip the fabric near the neck area.
Pin the dart and make sure its towards the bust point but stops before the bust point.
Outline the neckline, shoulder line, armhole, side seam and the dart.


Take off the calico from the dress form and include seam allowance of 1cm and for the side seam should be an allowance of 2cm. Make sure the darts are still pinned when trimming the allowance.


After that put the calico on the dress form again and make sure it matches the back bodice with some final adjustments.
Basic Bodice Dart (French dart and armhole dart)
Prepare the calico with basic marking, draw a line on the centre front marking the neckline and bust-line.


Pin the calico on the dress form at CF line at the neck, bust line and waistline. Smooth the fabric at the bust part and pin down the waist line which should be parallel to the dress form. There will be tension at the waist line, so there will be a need to snip the fabric. Smooth the fabric towards the side seam and a dart should form at the side seam. Pin down the side seam

After pinning the meeting point of waistline and side seam, move the fabric towards the arm hole and shoulder line.From the neckline smooth fabric to shoulder part and pin at the meeting point of shoulder and armhole. Make a dart at the armhole and pin it.


The darts should be pinned and made sure it towards the bust but stop before the bust point. There will also be an ease at the armhole area. Smooth slowly from the bust and shoulder and gather all ease at the armhole area to form the dart at the armhole area.

Near the neck, there will be tension, so you have to snip the allowance to form neckline.

Finally, outline the neckline, shoulder line, armhole, side seam and the darts.

Take the calico off the dress form and true the line with drafting rulers. Create a 1cm allowance and 2cm allowance on the side seam and trim the excess fabric. Make sure the darts are still pinned when cutting.


After that put the calico on the dress form again to make final adjustments and match it with the back bodice.
Basic Bodice Dart (Back dart)


Prepare the calico and mark the CB, the neckline, bust line and waistline. Draw a straight horizontal line across the fabric to make sure its perfectly on the cross grain.
Pin the fabric down the centre back line all the way down to the waist line. Pin the cross back shoulder mark to the armhole ridge of the dress form. Trap the ease at the shoulder line by pinning it with some gaps in between.
Smooth the fabric down and mark the centre of the armhole. Pin the side seam and the meeting point of the side seam and the waistline.
Make the dart at the waistline with the excess fabric by pinning and mark the dart on the left and right side.
Pin down the dart towards the side seam and release any tension by snipping any excess fabric below the waistline.
Outline the waistline, side seam, shoulder line, arm hole and dart and draw the seam allowance at 1cm and for the side seam allowance at 2cm. Cut any excess fabric.
Put it on the dress form again and make some final adjustments. Then match with the front bodice.
Reflection:
Draping the basic bodice was challenging for me because i have not done draping before. I believe that the technique for draping is to always smooth out the fabric, we should ensure not to leave eases unnecessarily. I also had problems finding the direction of pinning and its important that we always follow the direction of where the dart is facing. I think it's also diificult for me as a first timer because i am not used to pinning on dress form yet and one part i wanted to highlight is to ensure that the bust dart is actually pointing towards the bust point. Most important when draping everything should be smooth out and pinned properly, have relevant eases and snips to release tension.
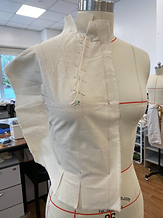
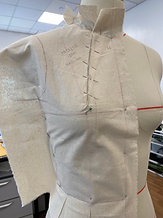
Manipulation of dart 1 (Intersecting darts)


Reflection:
Manipulating of darts felt more interesting to learn and also i had a hang of how the fabric moves in the dress form and my hands were more used with the drape than last week. For this week, we learnt about pivoting the dart, i realise that the position of the darts are not necessarily on the bust and waist but it can be put elsewhere to give a different effect for the garment. I also researched to find out when is this dart usually used and i found that it is often used as part of a style-line to suppress the fabric in an interesting way. The challenging part about draping this is when we reach the neck area as we have to snip the fabric to release the tension so we had to be mindful to not snip too much as it will affect the neckline and there wont be enough fabric to drape.
Manipulation of dart 2 (Asymmetrical dart)


Reflection:
This dart manipulation we did it as homework to explore on how to create darts at opposite sides one at the should and one at the waist dart. When i was draping this, i was more comfortable with draping the fabric and more aware on the direction to pin. I started draping this by first pinning down the centre front and identifying the bust point, i smooth out the fabric by moving the fabric up to the bust area, while doing this i knew there were tension at the waist area so i had to snip. As i pin the neck area i also had to release the tension near the neck by snipping it. I pinned the dart at the shoulder pointing towards the bust and did the same and pinned the dart at the waist pointing towards the dart. Both darts were almost parallel to each other but at opposite sides. I really enjoyed draping this because i was able to correct my mistakes along each step i drape and was able to rewind and correct my mistakes before moving on.
Deconstruction & Reconstruction


Reflection:
This was my favourite and most enjoyable draping class, we had to reconstruct and deconstruct old garments and to my surprise i actually managed to drape well. I took most of my inspirations of deconstruction from Maison Margiela and Rei Kawakubo deconstruction fashion. They are very talented in giving garments an unfinished appearance but yet looking avant garde and high fashion. For my drape at first i did a basic style of reconstruction a button up shirt as a one shoulder shirt and used a tshirt as an asymmetrical skirt but after much pondering i wanted to explore more. So i used the tshirt i used a skirt to drape a top by using the arm hole as the neckline and pinning up a few pleats near the bust and waist area i reconstructed a halter top with a tie back. Then i explored more with a long sleeve buttoned shirt and draped it a skirt, looks more like a low waist skirt with side buttons, to add more touch to it i folded the excess fabric into a flower like shape to create more texture to the garment. For the last drape i used both the tshirt and the shirt to drape a asymmetrical top, one side which i used the red shirt i tried doing some pleats which was very much inspired by the sari (traditional indian wear), i loved the look of it as it looks like its cascading down. The white tshirt i continued reconstructing at the back with knots and twisted it to look like a flower to give more texture to the garment as well. All in all, these was my favourite lesson of draping as i was able to open up my thinking caps and find intresting way to reconsttruct and deconstructi.

Research on Madeline Vionnet and Madame Grès
Designer Madeleine Vionnet (1876 – 1975) was one of Europe's greatest couturiers, famous for pioneering the revolutionary 'bias-cut' dress, draped expertly over the body, which changed the shape of women's fashion.
She travelled to London and found a job as a dress-fitter with couturier Kate Reilly, around 1897. With her new knowledge, she was determined to become a dressmaker, and returned to Paris in 1900, where she worked for the prestigious couture houses Callot Soeurs and Douçet.
She opened her own house on the Rue de Rivoli under the name 'Vionnet' in 1912. She experimented intensively with fabrics, often letting them dictate the shape or the effect of a garment. In the early 1920s, her couture house became known for championing the bias-cut, a technique of cutting across the grain of a textile to produce a carefully draped silhouette which clung naturally to the body. Vionnet's chic, free-flowing garments flattered the curves and forms of the female body, encouraging women to go without cumbersome corsets. A master geometrician, her bias-cut garments may appear simple, but their cut and construction are in fact complex, and always immaculately executed.
During the 1930s, Madeleine Vionnet experimented even more with classical-style draping and folding, inspired by the art of ancient Greece. Many of her garments were ingeniously constructed in one piece, without any fastenings. Madeleine Vionnet built an empire by rejecting corsets and buttons in favour of the bias cut.
Her iconic signature designs were the honeycomb dress, handkerchief dress, hemstitched blouse, cowl neckline and halter dress. She was also known to distinguish her creations from fakes by putting her fingerprints on the label of her garments.


.jpeg)

.jpeg)
Madame Alix Grès is widely regarded as one of the most brilliant couturiers of the twentieth century. She was known for using delicate pleats which turned ordinary fabric into Greek sculpture. She was born in 1903 in germaine krebs in paris where she originally wanted to be a sculptor but was unsuccessful.
She first gained attention by designing the costumes for Jean Giraudoux's play The Trojan War Will Not Take Place, and quickly became a leading designer of the day, whose clients included everything from duchesses to movie stars. The New York Times called her couture house "the most intellectual place in Europe to buy clothes". Grès pleated and tucked the materials into a shaping suitable to the body: the same fabric is buoyant and fluid when release-pleated from the waist down. She simulated a waist seam by tight tucking that continues through the bodice, and crowned the dress with volutes and twists. The combination of volume, drama, sculpture and classicism create a striking silhouette that encapsulates Grès' design sensibilities into the 1980s.
The most famous and recognizable design of Mme. Grès was her classically inspired floor-length, pleated gown. In the 1930s these "Grecian" garments were primarily white in color, made from uncut lengths of double-width matte silk jersey, most often sleeveless, and cut to enhance the female body without physically restricting its movement. By the onset of World War II, because of textile restrictions, Grès focused on the manipulation of the bodices, sleeves, and necklines of much shorter garments.
In the late 1940s Grès resumed the use of larger quantities of fabric as well as a tighter and finer style of pleating. Often referred to as the great "sculptress" of haute couture, Grès used the draping method to create her most dramatic designs, often consisting of puffed, molded, and three-dimensionally shaped elements that billowed and fell away from the body. lthough volumetric, her sculpted garments are supple and pliable and have no reinforcement such as an attached inner facing.
In 1970, Grès strayed away from her signature draping style and highlighted naked flesh. She highlighted the flesh by constructing vertical peek-a-boo openings in the bodice. Grès continued to design at her fashion house up until her 80’s when she retired from the Grès fashion house in the late 1980s. The final garment designed by Madame Grès was a swelling bodice dress ordered by Hubert de Givenchy in 1989.


What have I learnt from draping this semester?
Draping was one of the most challenging modules for me because I missed a few lessons due to medical reasons and it was really had for me to catch up. However, with the help of peers and lecturers I was able to catch up and I started to practice draping by myself during after school hours. I realised that in draping accuracy is very important, I should not anticipate where the darts are and I should let it form by itself. Thus, most of the times my drapes are not as accurate because I anticipate them and I might also not have the eases where there should be. However, I learnt from this mistakes and I was able to drape by myself accurately and properly and I am happy with the final result knowing that I have my tried my best.